
In this article I will give you a plan for taking on and preparing overgrown allotments. The aim is to get them in the right condition ready to plant and grow vegetables and fruit. This is part of my series on growing to become more self-sufficient.
It’s worth noting that I am not an expert. I consider myself a beginner so the idea of this series is to help you avoid my mistakes.
Taking on new and overgrown allotments
Taking on overgrown allotments requires a certain level of commitment to get it ready to plant and grow vegetables and fruit.
If you’re running the allotment alongside a full time job it’s worth taking your time and not rushing. The end result will be better and you won’t get put off when things don’t go quickly. The first time I took on an allotment I had many plans but zero experience.
I took on an allotment that was basically a waste ground that needed a LOT of work. Even though I prepared a bed big enough to grow potatoes, onions, and garlic, work eventually took over. Apart from getting enough potatoes and garlic to last almost a year, I didn’t have time to finish the rest. So, I started this new allotment project with a more realistic idea of what is possible.
When to start preparing an allotment
There is no right or wrong time to prepare an allotment. In this article I am going with the ‘taking it slow’ approach based on preparation in year one and growing in year two.
Planning how to prepare your allotment (step 1)
The aim of the plot is for it to be easy to maintain and productive so you get the most back from your hard work. This is a good approach to take;
- Buy your tools
- Setup a double compost bin
- Clear the plot
- Dig over the beds
- Add a central path
- Build the shed
- Add water butts to capture rainwater
- Build portable cages ready to protect what you grow
- Get ready to grow
You will end up with two long beds to grow vegetables and fruit either side of a central path. This means the two beds are easy to look after, easy to rotavate and fork or dig over every year.
What you’re going to plant and how you will rotate your crops every year will come in a different article. This article is going to focus specifically on how to prepare your plot.
Buying your tools (Step 1)
You can start with a simple set of tools to help you build a compost bin and clear the plot. You can expand what you have when you get to building the shed, which we’ll cover later.
My recommendation is to buy what you can afford. Price normally equals quality and the better you get the longer it will last, usually; however, you should pick a price point then do your research.
Here’s what I started with:
- Stainless Steel Digging Fork by Kent & Stowe
- Brick Line on Spool 75 Metres by Faithfull
- Pro Garden Hedge Shears – Sharp, Easy Cut, 600mm by Davaon
- Normal working gloves (for digging etc.)
- Thick gloves (for handling brambles)
- Selection of nails and screws
I’m lucky to have a local hardware store, Browns Home Hardware, where I buy most of my kit.
I already had a basic tool kit with screwdrivers, hammers, wood saws etc. I suggest getting something similar to:
- Magnusson tool kit, 40 piece set (including a tape measure)
- Irwin Jack 880 universal saw
- Mac Allister cordless drill
And, go to the allotment dressed to get dirty in boots, jeans, and a top to keep you warm. Buy second hand from a charity shop or use old clothes from your wardrobe.
Setting a double compost bin (step 2)
This is the first proper piece of work in clearing overgrown allotments. You’re about to clear away a lot of green matter that you want to keep. This can get you off to a flying start with home made compost.
It typically takes a year for green matter to turn into compost. Go for a double compost bin so that each year you are filling one side and using the other.
If you’re buying compost bins there are plenty of options. I prefer to do as much as possible myself as well as reuse materials. The ultimate recommendation is to build a double compost bin using bricks; however, most allotments don’t allow the building of permanent structures. Here I will cover building a low cost wooden double compost bin.
Here’s the double compost bin that I built:
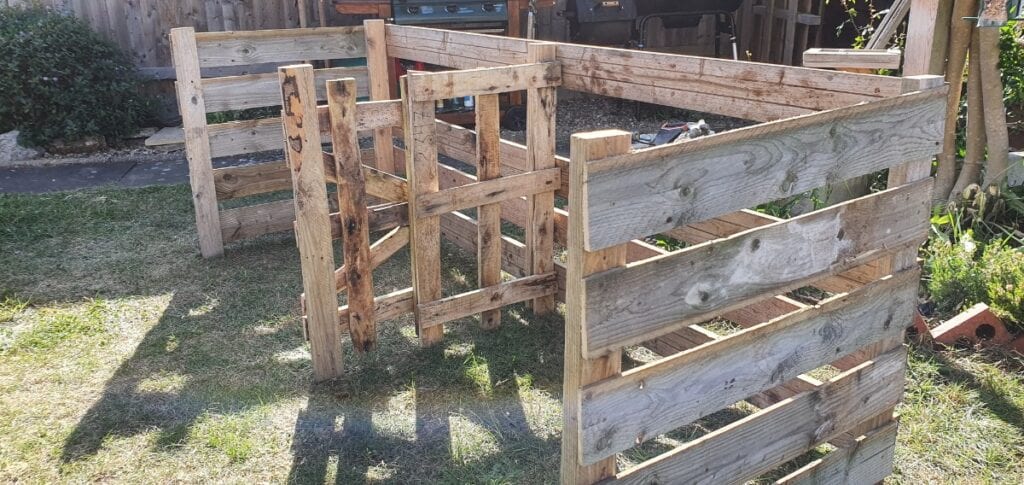
Gather your materials
- 5 lengths of old wooden decking or similar lengths of wood (approx 8 feet)
- 3 small pallets (or one large pallet)
- Your tools including the tape measure, drill, and wooden screws
To find free (or low cost) materials that others are giving away take a look at Gumtree and Facebook Marketplace. Be ready to go and collect the items straight away otherwise others will get there first.
Wooden decking is the perfect length for the back of the compost bin at approx. 8 feet so you end up with two bins of approx. 4 feet wide. If you use 5 and space them out evenly you will get a height of approx. 4 feet.
Build the compost bin
I repurposed some old fence panels and wooden slats; however, it will be much faster if you start with 3 old pallets as they make excellent and solid walls.
You might need to ask for help for this next part as you need to balance the pallets.
Get all 3 pallets, stand them on their sides and space them out. Lay the first piece of wooden decking along the top (that will become the back). Have a pallet at either end and in the centre of the decking. Fix the decking to each pallet using your drill and wood screws. Use wood screws that are larger than the hole you drilled so you get a nice tight fit. Repeat that so you have secured the decking into each of the pallets. Repeat to secure all of the pieces of wooden decking. Spacing out so they cover a total of 4 feet up the pallets.
Now you’re ready to turn the structure you have built so the decking becomes the back (like my picture above). The last job is to use the wood saw to trim off any wood that is overhanging. And that’s it. You now have your double compost bin.
If you need to transport it to your allotment, mark up where there are screws then take to pieces and flat pack.
Clearing overgrown allotments (step 3)
The weeds on my allotment were about 3 feet and I was determined to avoid fuel powered machinery where possible.
My plan was always to rotavate the plot to get a fine soil bed. My first task was to dig up all the perennial weeds with a fork. This will stop their roots getting cut up and growing back. My aim was to invest time in preparation to get the maximum return when I start growing. I love preparation and there is an excellent quote from Abraham Lincoln that sums this up:
“Give me six hours to chop down a tree and I will spend the first four sharpening the ax.”
Quote from Abraham Lincoln that really sums up the approach to take with preparing overgrown allotments.
It’s easier to dig up weeds when there’s a decent above ground. They’re easier to spot and pull out with their roots complete. I’m going for a hot compost heap so I decided to put most on the compost heap except thistles and brambles.
I liked taking my time working through the plot because it gave me a good understanding of the soil. The soil was light with a good quantity of sand. I expect to add a decent amount of well rotted manure or compost before planting.
Use a scythe to clear long weeds
I cleared the weeds using a Northumbrian Scythe from the fantastic John Seymour School of Self Sufficiency by Will Sutherland. It took me a week to clear, doing one hour each morning. The best bit about this part is it is a very pleasurable and satisfying feeling. Looking back at the plot and seeing such a difference. Knowing it’s been cleared without any machinery. Plus, it gave me an excellent start on the compost heap.
Dig over the beds (step 4)
Now the hard work starts…

This is just a case of doing an hour or two at a time, getting your gloves on, and digging 1 foot rows with your digging fork. My plot is about 8 meters wide so I decided to fork over just one half of it.
It took me about 2-weeks to fork over half of the plot, doing an hour or so each morning and a couple of hours on a Saturday. I actually find this very therapeutic because I can get into a good flow and it’s nice to do a job with a definitive start and finish and it’s very satisfying to step back and look at what I’ve achieved at the same time as feeling physically pushed.
As you fork over your plot (that is dig your fork in, lift the soil, and turn it over so the top soil is now underneath what you’ve just turned over) you should use it as an opportunity to pull up more roots because the more you get up the easier it will be when you want a nice clean plot with as few weeds as possible. I also quite liked the challenge of finding a bramble root and not giving up until I had dug a huge hole and trench to get the whole root out [to be honest I didn’t win every time as brambles are very good at surviving].
You may have read about double digging and various other methods. I’d say that double digging is good on a smaller scale but when you get to an allotment or larger then it becomes too time consuming and would just go with forking over at 1 spit depth (I go with the depth of the fork and turn that over).
Decide the most efficient way to dig over your allotment
Now, this is full disclosure time; after I had forked over half my plot I found somebody at the allotment that would rotavate my plot for a small fee and once they had rotavated my half plot they asked if I would like them to plough and rotavate the other half. That sounded amazing as I was only planning to prepare half of the plot this year. That got the whole plot dug over and rotavated very quickly. It was interesting to look at the comparison. After rotavating; my forked over half was much finer but it did take me two weeks vs less than an hour with the plough.
After the plot was rotavated the first time I waited 10 days and rotavated again then waited another 10 days and rotavated a third and final time. I’m doing this because weeds don’t like being continually knocked back and it’s important to avoid the roots getting established. That is all I needed to do this year with the plot and have used Yuzet Heavy Duty Weed Control Fabric Membrane to cover the entire plot. Covering the ground cuts out sunlight and increases the temperature, which should kill off the weeds ahead of spring when I will rotavate another three times then get cracking with planting.
Add a central path (step 5)
The trick here is getting online and finding people that are giving away paving slabs to keep the cost down. All of the allotments I’ve seen just have grass or soil paths but that seems like a missed opportunity because concrete/paving slabs are a simple way to cut down on slugs moving around your plot.
If you’re going to do the path properly you will level out a strip down the centre of your plot, add an underlay of heavy duty weed control fabric then a layer of sand and lay your slabs on top for a nice level surface; however, that might seem like too much and you may just want to go with paving slabs directly on open soil. It really depends how long you plan to have the plot and the time you want to invest now vs less maintenance ongoing.
Build the shed (step 6)
Here you have tons of options. Buy a shed. Buy the excellent book How to build a shed by Sally Coulthard or get back online and find people giving away pallets for free or low cost.
Now, I was very lucky to inherit a couple of very sturdy sheds in my allotment plot but if I was starting from scratch I would go down the pallet route. I’m aiming for a shed that can keep just my essentials because I’m going to keep my main tools at home because, unfortunately, thefts are common on allotments and I don’t want to lose the tools I’ve invested in.
There are tons of plans on the internet with ways to use pallets to build a shed. This is a great example of a very professional way to build a shed using pallets (you might not want to go with the brick base but the rest of the article is a great explanation of how to use pallets to build the walls and roof or a shed).
Add water butts to capture rainwater (step 7)
I’ve never known an allotment that has hoses so you need to do something to create your own water source to avoid walking back and forth from the nearest shared water butt.
Once you have the shed up it’s an easy exercise to set up water butts so you have your own water source on your plot. Go back to the internet and hunt around for people giving away or selling second hand water butts as well as guttering. Once you have that you might need a quick trip to the local hardware store to pick up some guttering brackets and pipe so that you can fit the guttering to your shed and set up your water butt to fill up whenever there’s rain. Don’t forget to fit a tap to the bottom of your water butts and to buy at least one watering can, which you can likely find online second hand or from your local hardware store.
Build portable cages ready to protect what you grow (step 8)
At this point we’re just getting ready for next season because we don’t need to grow anything yet. The trick here is to build portable cages that you can move around your plot to give protection to your fruit and vegetables at the point they need it most. This is to protect them from birds but also from butterflies that will lay eggs that turn into caterpillars that will devour your crops.
Purchase a roll of debris netting (or demolition netting) such as this Debris & Scaffold Netting from Yuzet then take a look online to find any second hand lengths of wood, such as these timber roof battens. Then you can make a simple box with the battens, fixing them together using your drill and wood screws, then layover the debris netting, cut to size, and fix in place by laying another roof batten over the existing batten.
You’ll want to make two or three portable cages of different sizes. They can all be approximately 4 feet square, as that is a good bed size for when you plant your veg, but you should vary the height so you have options for low down vegetables, such as broccoli, and tall vegetables, like peas.
Get ready to grow (step 9)
Even if you’ve finished all of the above well before winter you should still spend some time each week at your plot, digging up weeds and keeping it in a good condition. You also need to keep an eye on your compost heap to make sure that it is breaking down nicely. If you’ve taken the step to save as much water at home as possible you should consider buying a 5 litre bottle and using that as a pee pot as it contains nitrogen that will boost the bacteria in your compost heap to help it turn the green matter into compost a lot faster (plus it saves LOT of water – consider every flush is about 6 litres of freshly cleaned drinking grade water that is such a waste to use for flushing down the toilet).
In spring you’ll want to rotavate your entire plot another three times over one month, each time you may want to add compost or well rotted manure to help improve the soil quality and use the rotavator to dig it into the soil, and then you’re ready to go. If there are any areas of your plot where you won’t plant immediately you should consider putting the ground cover back down to stop any weeds getting established.
Part of preparing to grow is also planning what you will plant, your crop rotation from year to year, and the time you’ll spend at your allotment to have the best chance of eating fantastic, homegrown, and chemical free organic food, at a very low cost, but we’ll get to that in another article.
Where Next?
There is so much inspiring information to give you ideas of how to help climate change by growing, eating, and living sustainably, you can:
- Read Our Articles
- Sign-Up to Our Free Email Newsletter
- Get Started and Vote with Your Money
- Try the Sustainability Roadmap
- Use the Company Directory
- Support Nafford Junction
Help Us Inspire Others
If you are passionate about helping climate change, please consider supporting Nafford Junction, you can:
- Become a Patron to Give Regular Contributions
- Buy Me a Coffee to Make a One-Off Contribution
- Create for Us and Publish Thought Provoking Content
- Become an Inspiring Leader and Advertise with Us
- Go to NaffordJunction.co.uk/support
Production Notes
This was produced by me, James Walters, as a personal project to help stop climate change by inspiring others to grow, eat, and live sustainably.
Any advice given is the opinion of those involved and does not constitute medical, financial, or legal advice.
* We include links we think you will find useful. If you buy through those links, we may earn a small commission. It’s one way to support our work and to inspire as many people as possible.